Friday, November 30, 2007

learning shapes collage, kids educational craft


Todays project was very easy but kept my 5 year old entertained for almost 2 hours.

I needed any easy project today, that didn't require much mom help (it was cleaning day). My 2 1/2 year old was sleeping so this was the perfect educational craft.

items needed:
Large piece of paper
glue stick
scissors
marker
old newspapers or magazines

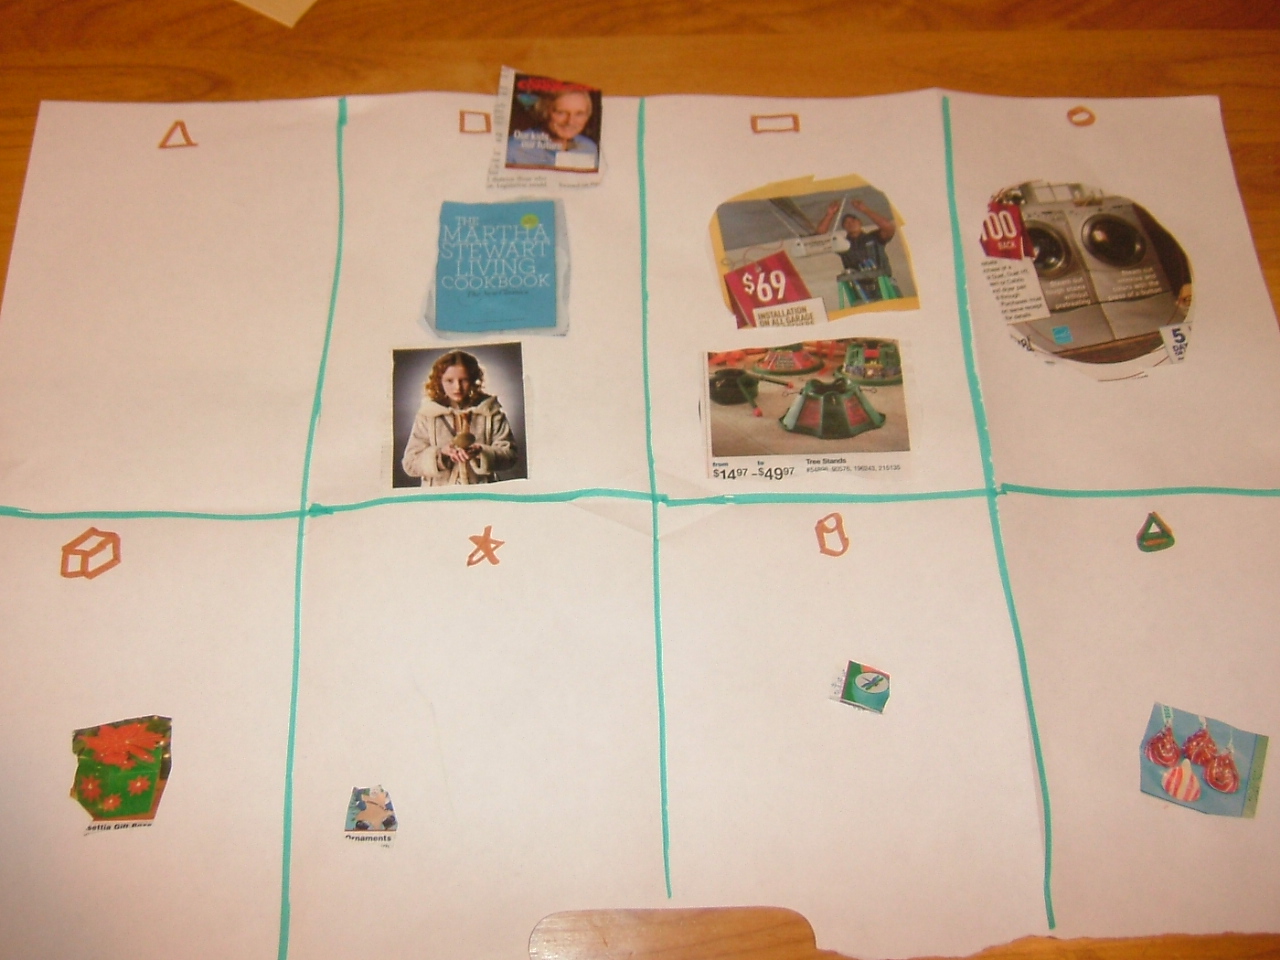
Divide the paper into columns or a grid. Label each box with the a small drawn picture of a shape. I used triangle, square, rectangle, circle, cube, star, cylinder and cone.
Have your child search through the magazines or newspaper ads to find pictures that they think represent each shape. Then have them cut out the pictures and glue them in the appropriate box.
It is a simple project, but my daughter had alot of fun looking for the shapes and worked on her scissoring skills at the same time.

This project was 2 1/2/ hours start to finish (set-up and clean-up), was free and required only about a half hour of parent involvement. This would be a great group project.

Thursday, November 29, 2007

Snowman craft, winter kids craft


Today we made our third project from our halloween pumpkins. Yesterday I cleaned the pumpkins and spray painted them white.
This project was about an one hour and fifteen mintues from set-up to clean-up
(that includes the time to spray paint the pumpkins the previous day). This project was free for us today, we already had all of the items in our house.

Items used:
white spray paint
3 mini pumpkins
3 remant pieces of fabric for the scarf
push pins
glue
google eyes
colored sticky foam board (you could use colored paper)
3 buttons
markers

First we cut large circles out of the black foam board for the hat brim. a small circle was cut out of the center so that it fit over the stem.
We cut a long strip of foam board with slits on the bottom to made the hat. folded the top down a bit and stuck another small circle for the top of the hat.
We used push pins to hold down help hold the hat the hat down on the pumpkin
We glued on the eyes, used glue and push pins to hold the nose in place.
Cut a mouth and checks out of the foam board and stuck them on
I tied the scarf around the bottom of the pumpkin and held it on with push pins.
The final touch was to let my girls color on them with markers.

The results were very cute.

Wednesday, November 28, 2007

One mini pumpkin, 3 holiday crafts

We used mini pumpkins for Halloween this year. They were easier for our kids to do on their own.
We painted them with washable paint (which can flake off), glued google eyes on them and decorated them with markers and stickers.
Once Halloween was over we washed the paint off put the eyes back the craft box and made the turkeys featured here in my blog.
Now that thanksgiving is over we have pulled the turkeys apart, saved the feathers and google eye for future projects. And washed off the washable markers we used to decorate them with.
We started with 4 pumpkins for Halloween, 2 were dispalyed outside on the porch and two were on the mantle. Only one of the pumpkins had to be thrown out (it became soft). Displaying the crafts outside helped them last longer.
Our next project will be to turn these into snowmen, I am figuring that project out today and will post our craft as soon as we put it together. My plan is to paint the pumpkin white.

I am excited to experiment with reusing items from our previous projects. I am trying to teach my kids to recycle and be eco friendly. They enjoy watching their items turn into something new.

Tuesday, November 27, 2007

Thanksgiving turkey craft, pumpkin kids craft


Here is the craft that inspired this blog.
Pumpkin thanksgiving turkeys
We were bored one day in early November and decided to make turkeys.
We washed the paint off of our halloween pumpkins, cut tail feathers, a circle for the head, beak and wings out of foam paper from our craft box.
We used paper fasteners to stick the head, tail and wings into the pumpkin.
then we glued the eyes and beak on.
They were adorable, we made four of them. They added a festive touch to our porch and fireplace mantel this year.

holiday santa craft for kids


Today's craft is a Santa Claus head made out of a butternut squash. I love to use items that we eat in our crafts.
Items I used:
3 butternut squash
3 old socks
cotton balls
glue
straight pins
foam stickers
google eyes
pipe cleaners
3 pom pom balls
This craft took about an hour from set-up to clean-up.
The butternut squash cost $5.50 and the rest of the items were already in our craft box.
we used the glue and straight pins to hold everything on. I had the girls hold the items while I pushed the pins in. they were able to fluff up the beard and hair once pressed on. The beard was two cotton balls under the mouth and 1/2 a cotton ball stretched out above the mouth.
We used a blow dryer to help dry the eyes so that they didn't run down the face.
I had to help my daughters quite a bit with this craft, but they choose all of the colors and helped with each step. They were proud to display their work on the mantle. I hope to use the squash again in another future craft.

snowman cookies, winter kids craft


Today we attempted to make snowman sugar cookies. I am not a great cook, so we bought refrigerated sugar cookie dough. We used sprinkles for the hat and snow on the bottom and round decorative candies. We used pieces of dried spaghetti for the arms and hat brim. This was a simple and fun craft the girls loved it and were great for the entire time, they couldn't wait to taste their creations.
The snowmen grew a bit in the oven, but they tasted great.